26 March 2026 - Photography Tips by Professionals

A Guide to Forest Light Photography

Mastering Low-Light and High-Contrast Conditions

Forest light is some of the most challenging (and most rewarding) light a wildlife photographer will ever work with. Here are some guidelines on how to approach photography in a forest setting, including tips by wildlife photographer Pandora Maund. Let’s make it work for you, not against you.

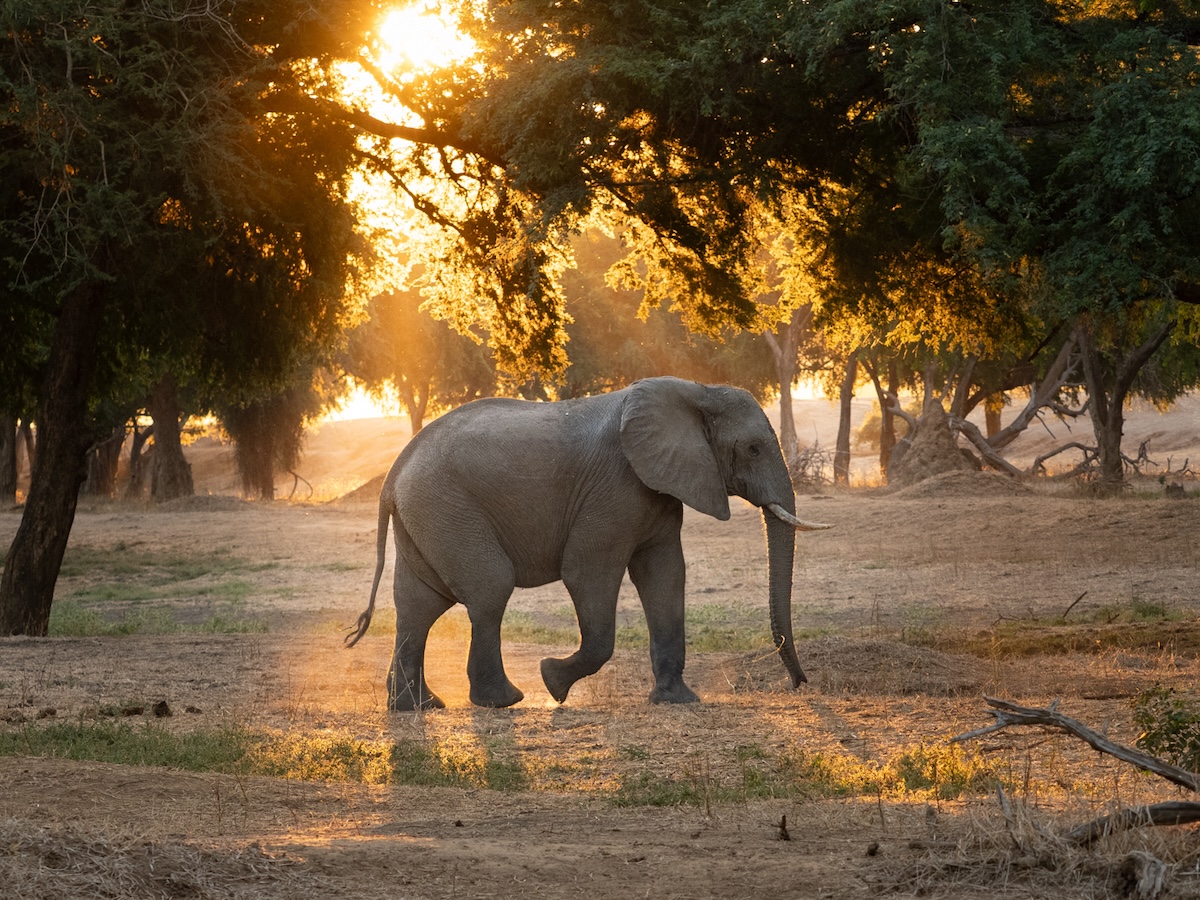
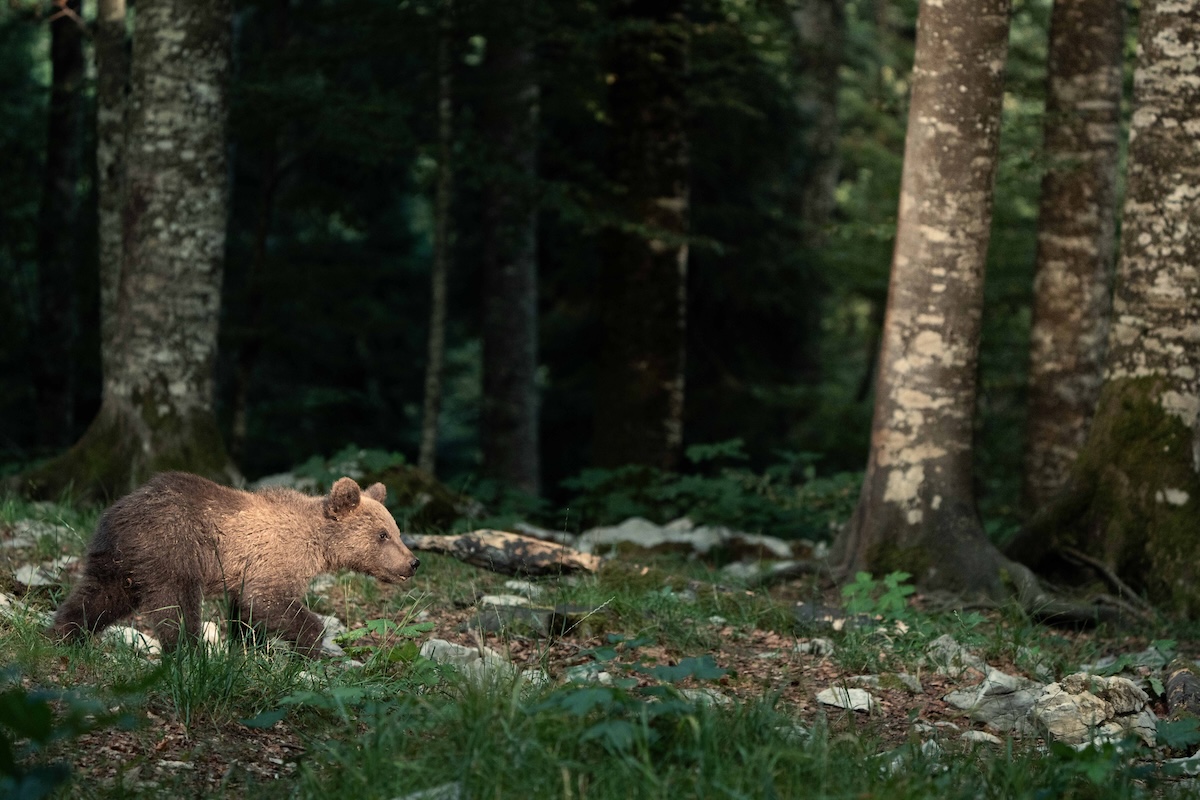
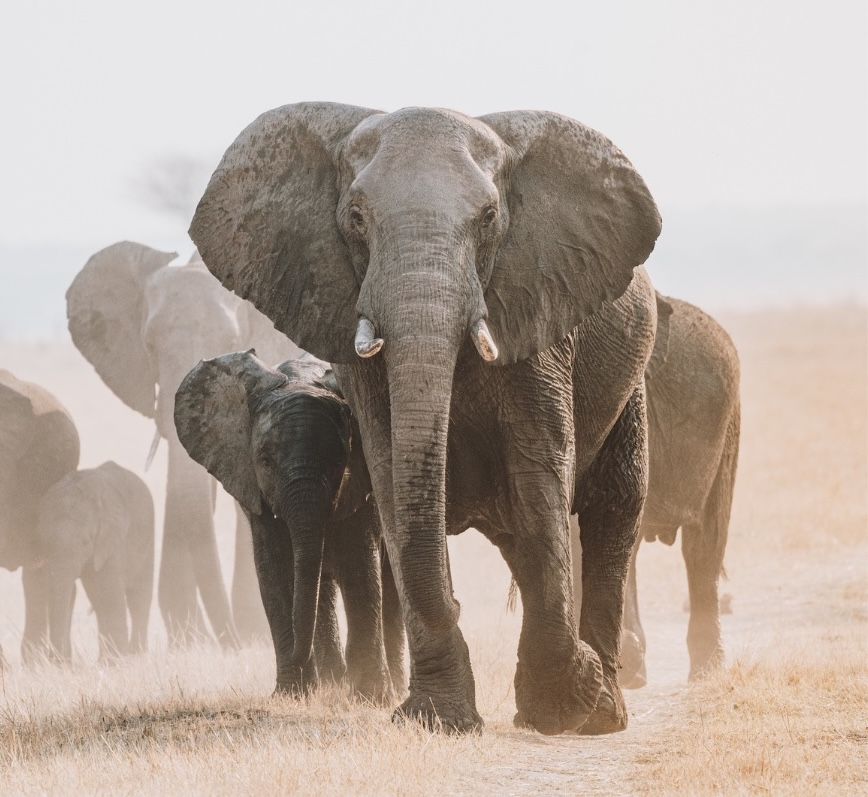
Venture into a forest with a camera, and you’ll quickly realise that everything you know about exposure gets tested. Light that looks beautiful to the eye can be a technical nightmare on a sensor, and your subject disappears into darkness one moment and is swamped in harsh contrast the next. Forest photography demands a different way of thinking. It’s less about finding ideal conditions and more about reading what’s in front of you and responding quickly and confidently. Whether you’re photographing brown bears in the forests of Slovenia, elephants in thick African bush, or birds moving through a dense canopy, the same principles apply. Master the light, and you’ll make images that feel genuinely atmospheric. 

Images by Pandora Maund, Marko Poolamets, and Sam Turley

bear photo tour Slovenia

Why forest light is so difficult

The core challenge is dynamic range. A forest scene can contain both deep shadow and bright sunlight within the same frame, often just meters apart. Your camera sensor struggles where your eye adapts with ease, as it simply cannot hold detail at both ends of the tonal spectrum simultaneously. You’re always making a choice about which part of the scene to expose for, and that choice defines the character of the image. Low light compounds this further. Under a dense canopy, even on a bright day, you may be working with surprisingly little light at ground level. Add in a subject that moves, like a bear foraging, a fox picking its way through undergrowth, and the familiar tension between shutter speed, aperture, and ISO becomes acute.

The exposure triangle in a forest context

In low-light forest conditions, every setting involves a trade-off. There is no perfect solution; there’s only the best available compromise for the scene in front of you.

Aperture is usually your first lever. Shooting with a wide open aperture (a low f-number) lets in the maximum amount of light and is generally the right starting point for wildlife in forests. It also produces a shallow depth of field, which helps separate a subject from a busy, cluttered background. One useful and often overlooked technique: if your lens allows it, shooting at a slightly wider focal length rather than zoomed fully in can give you a smaller depth of field while still admitting more light to the sensor.

Shutter speed is where the real balancing act begins. A slower shutter speed lets in more light, but too slow and you introduce camera shake or motion blur from a moving subject. Finding the lowest shutter speed that still freezes your subject, or that you can handhold cleanly, is a skill that develops with practice. There’s no single right answer; it depends on your focal length, the weight of your setup, and how much your subject is moving.

ISO is the quality dial. Raising your ISO brightens the image but introduces digital noise, which reduces the sense of sharpness and detail, particularly in shadow areas. The goal in forest shooting is generally to keep ISO as low as the scene allows, using aperture and shutter speed to do as much of the exposure work as possible before reaching for ISO as a last resort.

elephant with back light by Pandora Maund

Patches of light: your most powerful compositional tool

In open habitats like savannah, coastline, and open moorland, light tends to be consistent across a scene. In a forest, light is scarce, localised, and constantly shifting. A single beam breaking through the canopy becomes enormously valuable, and learning to use it is one of the most important skills in forest photography. The technique is simple in principle but requires patience in practice: identify where the light is falling, and wait for your subject to move into it. A brown bear in shadow is a difficult photograph. The same bear stepping into a pool of warm morning light is a memorable one. This is as much about stillness and observation as it is about technical skill. It’s about watching, anticipating, and being ready when the moment comes.

Beyond waiting for subjects to enter the light, it’s worth moving around to find angles where the available light is working in your favour. Sometimes a small change in position puts your subject against a darker background with light falling on their face rather than behind them.

Dapple, shadow, and thinking creatively about contrast

High contrasts are a challenge, but they can also be an aesthetic opportunity. The dappled light of a forest canopy, the deep shadows between trees, the rim lighting that picks out the edge of an animal’s fur: these are qualities specific to forest environments, and they can produce images with a mood and atmosphere that no other setting offers.This requires a shift in mindset. Rather than trying to expose for a scene as evenly as possible, consider what you’re trying to convey. A dark, shadowed frame with a single lit subject can be extraordinarily powerful. A silhouette against a backlit canopy. A face half in light, half in shadow. These are creative choices, and forest conditions make them available to you in ways that open, evenly lit settings do not.

Wide compositions also tend to be more forgiving in high-contrast forest light than tight close-ups. A close-up crops into exactly the area where the contrast between shadow and highlight is most severe. A wider frame distributes that contrast across the scene, allows the environment to tell part of the story, and gives you more latitude in post-processing.

Ural owl Estonia

Backlighting and deliberate underexposure

One of the most striking techniques available in forest photography is to lean into backlight rather than avoid it. When the sun is behind your subject, the instinct is often to reposition or to try to expose for the subject’s face. But deliberately underexposing a backlit subject can produce something far more compelling: a glowing rim of light around an animal in near-silhouette, surrounded by the dark tones of the forest. It’s a technique that requires confidence and some experimentation, but when it works, it produces images that are immediately distinctive.

The key is intention. Underexposure used deliberately, with a clear sense of what you’re trying to create, is a creative tool. Underexposure by accident, because you weren’t sure what the camera was metering for, is just a dark image. Know what you want before you press the shutter.

Practical preparation for forest shoots

  • Arrive early. Morning light in a forest is generally softer and more directional than midday light, and wildlife tends to be more active in the first hours after sunrise.
  • Know your camera’s high-ISO performance. Shoot some test frames at ISO 3200, 6400, and beyond before you’re in the field, so you know exactly what you’re working with and where noise becomes unacceptable.
  • Set a minimum shutter speed in auto-ISO mode if your camera supports it. This lets the camera manage ISO while keeping your shutter speed above a threshold you’ve chosen, which is useful when light is changing quickly.
  • Shoot RAW. In high-contrast conditions, having the full tonal information available in post-processing, particularly in the shadows, gives you options that a JPEG simply doesn’t.
  • Move quietly and slowly. In forest environments, proximity to wildlife often depends on how little disturbance you create. This is especially true in hides, where patience and stillness are as important as any camera setting.
back-lit monkey by Pandora Maund

Pandora Maund’s tips for forest light

Pandora Maund is one of our photography guides and leads our bear photography workshop in Slovenia, which one of the most demanding and rewarding forest photography environments in Europe. Here are her tips for shooting in low-light and high-contrast forest conditions, in her own words:

EXPERT ADVICE – Pandora Maund on shooting in forest light:

  • Depending on your subject, you will need to compromise on the settings you would ideally like, in favour of what the conditions will support.
  • It is about the fine balance between image sharpness (shutter speed) and image quality (ISO).
  • For wildlife I’d generally be shooting at a small depth of field with a wide open aperture. On some lenses it might be beneficial not to zoom in fully, as shooting wider may enable you to achieve a shallower depth of field, which will allow more light onto the sensor.
  • A longer shutter speed than you would normally wish for will also allow more light onto the sensor. Finding the optimal speed while ensuring there is no camera shake and the subject is sharp is a fine line — but a worthwhile one to walk.
  • Both of these techniques will enable you to keep a lower ISO, which will improve the quality of the image.
  • In forests, look for patches of light and wait until your subject moves into them.
  • Look for interesting dapples and shadows, and think about your image more creatively.
  • Shoot a wider scene rather than a close-up shot, as close-ups are a lot less forgiving when viewed.
  • Use backlight and underexpose a subject to create something truly striking.
bear photography Slovenia

Putting it all together

Forest photography asks you to slow down, read the environment, and make decisions with intention. The light is rarely what you’d choose, but working within its constraints, rather than against them, is what separates technically competent images from genuinely memorable ones.

Put your skills to the test during a bear photography workshops in Slovenia

Other recent posts

Close Menu

TOURS

VOLUNTEERING

DESTINATIONS

PHOTOGRAPHY FOCUS

ABOUT US

BLOG

PHOTO COMPETITION

ENQUIRE

BACK

PHOTOGRAPHY FOCUS